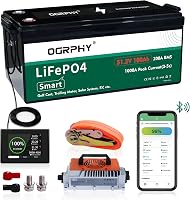
How to Convert an RV to Lithium Batteries
A lithium battery conversion for an RV starts with checking your power needs, battery space, charging sources, and cable sizes. Then replace the battery bank with compatible LiFePO4 batteries and adjust charging equipment for the new chemistry.
On this page (8 sections)
- What does an RV conversion to lithium batteries involve?
- How do you size the new RV lithium battery bank?
- Which RV charging systems need changing?
- Do you need new cables, fuses, or a battery monitor?
- How should you install and protect the lithium batteries?
- How do you choose the right 12V lithium battery for an RV?
- What should you check after the conversion?
- Is a lithium battery conversion for an RV worth planning?
A lithium battery conversion for an RV starts with checking your power needs, battery space, charging sources, and cable sizes. Then replace the battery bank with compatible LiFePO4 batteries and adjust charging equipment for the new chemistry.
Lithium batteries can offer more usable capacity and lower weight than lead-acid batteries, but the conversion needs planning. Your converter, solar controller, alternator charger, fuses, cables, and battery monitor all need to work with the new system.
What does an RV conversion to lithium batteries involve?
An RV conversion to lithium batteries replaces the house battery bank and updates the equipment that charges it. The main work is matching the battery voltage and capacity, confirming physical fit, and setting each charging source for lithium chemistry.
Most RV lithium conversions use 12V LiFePO4 batteries. Before choosing one, record the existing battery dimensions, terminal position, cable sizes, fuse rating, and the appliances you use away from shore power.
A deep-cycle battery guide explains how house batteries differ from starting batteries. That distinction matters because an RV house bank is designed to supply steady power over longer periods.
How do you size the new RV lithium battery bank?
Size the new battery bank from daily energy use and the time you spend without shore power. List the wattage and expected hours for lights, fans, water pumps, refrigerators, inverters, and other loads, then convert the total into amp-hours at 12V.
A lithium battery's rated capacity is not the only number that matters. Check the usable capacity, discharge limits, charging limits, and battery management system details before deciding how many batteries you need.
You should also check whether the new bank fits the compartment. Compare length, width, height, terminal position, cable access, and ventilation needs rather than assuming a battery with the same voltage will fit.
Which battery products help with RV battery planning?
The right product depends on the job. A battery box helps secure and protect a compatible battery, while a 12V sealed lead-acid battery may suit a small replacement or a temporary non-lithium setup.
The Attwood 9067-1 Vented Battery Box with Mounting fits Group 27 Series Batteries and has interior dimensions of 13.06 x 6.9 x 10.5 inches. It includes a 40-inch mounting strap and hardware, with a vented design and acid-resistant polypropylene construction.
This box is useful when your battery installation needs a defined enclosure and hold-down system. Measure the compartment and compare the Group 27 fit before using it with any battery bank.
The Interstate Batteries 12V 35Ah SLA AGM Deep is a 12V, 35 amp-hour sealed lead-acid AGM battery with insert terminals. It measures 7.68 x 5.16 x 6.42 inches and is listed for uses including wheelchairs, trolling motors, scooters, and RVs.
This battery is not a lithium battery, so it isn't the final choice for a lithium conversion. It can help when comparing the size, terminal style, and capacity of a smaller lead-acid setup with the lithium bank you plan to install.
The ExpertPower EXP1270 is a 12V, 7 amp-hour sealed lead-acid rechargeable battery with F1 terminals. It measures 5.9 x 2.5 x 3.7 inches and is designed for uses such as alarm systems, UPS equipment, emergency lighting, and other 12V devices.
Its small capacity makes it unsuitable as a typical RV house battery bank for larger loads. It can still help you understand how capacity, terminal type, and physical size affect battery selection.
Which RV charging systems need changing?
The converter, solar controller, alternator charger, and shore-power charger all need review during a lithium battery conversion for an RV. Each source must use a charging profile suitable for the new battery chemistry.
Start with the RV converter. If it has a lithium mode, follow its instructions for selecting that setting.
If it only supports lead-acid charging, check whether it should be replaced or isolated from the lithium battery bank.
Solar charging needs the same review. A solar controller may have a lithium setting, adjustable voltage limits, or a battery-type menu.
Confirm the controller's maximum charging current and make sure the wiring and fuse protection match the system.
Alternator charging deserves special care. A direct connection between an alternator and a lithium battery bank may not provide the control your vehicle and battery require.
A lithium-compatible DC-to-DC charger can be part of the design, but select it based on the vehicle, alternator, battery bank, and wiring.
For solar planning, compare the best RV batteries for solar power with your expected panel output and charging setup. The battery bank must be large enough for your loads, while the charging equipment must stay within the battery's limits.
Do you need new cables, fuses, or a battery monitor?
You may need different cables, fuses, or a monitor if the new battery bank has higher charging or discharge limits. The correct parts depend on cable length, current, installation layout, and the protection required by the system.
Inspect the positive and negative cables before installing the battery. Check for loose terminals, corrosion, damaged insulation, undersized wires, and cable routes that could rub against metal.
Keep overcurrent protection close to the battery's positive connection. Use a fuse or breaker sized for the cable and system design, not simply for the maximum number printed on the battery.
A battery monitor can help you track state of charge more accurately than voltage alone. Install its shunt and sense wiring according to the monitor instructions, and make sure every relevant negative connection is routed through the shunt.
How should you install and protect the lithium batteries?
Install the batteries in a dry, secure compartment with enough room for terminals and cable bends. Follow the battery instructions for orientation, temperature limits, spacing, connection order, and parallel or series use.
Disconnect shore power, solar input, alternator charging, and other charging sources before removing the old battery bank. Label the cables before disconnecting them, and confirm polarity with a meter before connecting the new batteries.
Use a battery box or other enclosure only when it fits the battery and supports the installation. The Attwood 9067-1 is designed for Group 27 Series Batteries, so its dimensions do not make it a universal fit for every lithium battery.
Avoid placing a lithium battery where freezing temperatures could affect charging. Review the battery's low-temperature charging protection and the conditions inside the RV compartment during storage and travel.
How do you choose the right 12V lithium battery for an RV?
Choose a battery by usable capacity, physical fit, continuous current limits, charging limits, terminal layout, temperature protection, and compatibility with the RV's charging equipment. A higher amp-hour number is useful only if the battery fits and the system can charge it correctly.
Start with the best 12V lithium batteries for RVs when you need to compare battery sizes and features. Then check the total bank capacity against your inverter, refrigerator, water pump, lighting, and other loads.
If your system needs a specific LiFePO4 format, review the best LiFePO4 batteries for RVs. Confirm whether batteries can be connected in parallel, how many are allowed, and whether the internal battery management systems support your planned arrangement.
Lithium battery production and disposal also have environmental effects. Read what is environmental impact of lithium batteries before choosing a replacement and plan how to recycle the old battery responsibly.
What should you check after the conversion?
After installation, check polarity, terminal tightness, fuse placement, charger settings, battery monitor readings, and cable temperature under load. Test each charging source separately so you can identify a problem before combining shore power, solar, and alternator charging.
Watch for warning signs such as hot cables, a tripped fuse, unexpected battery shutdown, charging that stops too early, or a monitor that shows impossible readings. Turn off the affected source and follow the battery and charger instructions.
Don't use a lithium battery power station as a substitute for redesigning an RV house battery system. If you travel by air with portable lithium equipment, review is it safe to fly with a lithium battery power station because transport rules differ from RV installation rules.
Is a lithium battery conversion for an RV worth planning?
A lithium battery conversion for an RV makes sense when you need more usable house-battery capacity, want to reduce battery weight, and are ready to confirm every charging source. It is not simply a matter of removing lead-acid batteries and connecting batteries with the same voltage.
Pick the battery bank after measuring the compartment and calculating your daily loads. Choose compatible charging equipment, protect the cables with correctly sized overcurrent devices, and use a secure installation.
For a small 12V load, the Interstate 35Ah AGM or ExpertPower 7Ah battery may fit a lead-acid comparison or separate low-demand use. For the conversion itself, focus on a correctly sized LiFePO4 bank and read the best LiFePO4 batteries for RVs before making the final plan.
Frequently asked questions
Can you replace RV lead-acid batteries with lithium batteries?
Yes, but a lithium replacement needs more than the same voltage and physical space. Check the battery bank size, terminals, cable routing, charger settings, converter compatibility, solar controller settings, and battery temperature limits before removing the lead-acid batteries.
Do I need a new RV converter for lithium batteries?
You may need a lithium-compatible converter or a converter with a suitable charging profile. Some RV converters can charge lithium batteries correctly, while others may stop at a lead-acid voltage or fail to provide the charging pattern the new battery requires.
Can RV solar charge lithium batteries?
Yes, RV solar can charge lithium batteries when the solar charge controller supports the battery chemistry and is configured correctly. Check the controller's voltage settings, current limit, wiring, and low-temperature charging protections before connecting the new battery bank.
What should I check before a lithium battery conversion for an RV?
Check the battery compartment dimensions, total amp-hour capacity, cable size, fuse protection, converter, solar controller, alternator charger, shore-power setup, and battery monitor. Confirm that each charging source supports the lithium battery's required voltage and safety limits.